|
Студопедия КАТЕГОРИИ: АвтоАвтоматизацияАрхитектураАстрономияАудитБиологияБухгалтерияВоенное делоГенетикаГеографияГеологияГосударствоДомЖурналистика и СМИИзобретательствоИностранные языкиИнформатикаИскусствоИсторияКомпьютерыКулинарияКультураЛексикологияЛитератураЛогикаМаркетингМатематикаМашиностроениеМедицинаМенеджментМеталлы и СваркаМеханикаМузыкаНаселениеОбразованиеОхрана безопасности жизниОхрана ТрудаПедагогикаПолитикаПравоПриборостроениеПрограммированиеПроизводствоПромышленностьПсихологияРадиоРегилияСвязьСоциологияСпортСтандартизацияСтроительствоТехнологииТорговляТуризмФизикаФизиологияФилософияФинансыХимияХозяйствоЦеннообразованиеЧерчениеЭкологияЭконометрикаЭкономикаЭлектроникаЮриспунденкция |
Laboratory work № 11- PART 3Objectives: Ø Creating a Collection – Video and Audio Ø Optimizing for the Web
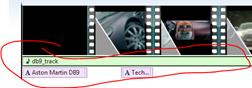
For this tutorial we will be creating a promotional movie for the Aston Martin DB9 sports car using videos, sound and text (instead of images as in the previous sections).
and this time browse to the snd folder in your lab11 folder and select the file called db9_track.mp3 and click on the Openbutton.
a. Add a TITLE at the beginning of the movie Effect:Swing down à Font: Verdana (Bold) Size: 28 Text: o Text Line 1 à Aston Martin DB9 o Text Line 2 à A striking balance
b. Db9_clip_000 - Add CAPTION on the selected clip Effect: Zoom in - big à Font: Verdana (Bold) Size: 16 TextAlignment: right Ø Text à Technical Innovation Tested Meticulously
c. Db9_clip_001 - Add CAPTION on the selected clip Styles and Effects: Same as in (b) above. Ø Text à Understated Elegance
d. Db9_clip_002 - Add CAPTION on the selected clip Styles and Effects: Same as in (b) above. Ø Text à Two-Way Communication
e. Db9_clip_003 - Add CAPTION on the selected clip Styles and Effects: Same as in (b) above. Ø Text à Designed to Stir the Soul
f. Db9_clip_004 - Add CAPTION on the selected clip Styles and Effects: Same as in (b) above. Ø Text à Reassurance in an Unpredictable World
g. Db9_clip_005 -Add CAPTION on the selected clip Styles and Effects: Same as in (b) above.  Ø Text à DB9: 100% Aston Martin
h. Add CREDITS at the end of the movie Effect: Scroll (the default effect) Font: Verdana (Bold) Size: 20 TextAlignment: centre Ø Text Line 1 à DB9 Ø Text Line 2 à Aston Martin of Ontario Ø Text Line 3 à www.astonmartin.com
This will bring up the Music Options tab:
a. Change the Start time for the audio to be 6 (it will start 6 seconds into the movie) b. Change the Fade out to be Slow (this will slowly fade the sound out at the end of the movie)
a. Click on the top left dropdown arrow to get the file menu and select Save Movie>CS1033movie. b. The filename of your movie should be DB9_Final and should be saved under your lab folder.
LABORATORY EXERCISE №12 |
||
|
|
Последнее изменение этой страницы: 2018-04-12; просмотров: 969. stydopedya.ru не претендует на авторское право материалов, которые вылажены, но предоставляет бесплатный доступ к ним. В случае нарушения авторского права или персональных данных напишите сюда... |


 Change the duration to 3.00.