|
Студопедия КАТЕГОРИИ: АвтоАвтоматизацияАрхитектураАстрономияАудитБиологияБухгалтерияВоенное делоГенетикаГеографияГеологияГосударствоДомЖурналистика и СМИИзобретательствоИностранные языкиИнформатикаИскусствоИсторияКомпьютерыКулинарияКультураЛексикологияЛитератураЛогикаМаркетингМатематикаМашиностроениеМедицинаМенеджментМеталлы и СваркаМеханикаМузыкаНаселениеОбразованиеОхрана безопасности жизниОхрана ТрудаПедагогикаПолитикаПравоПриборостроениеПрограммированиеПроизводствоПромышленностьПсихологияРадиоРегилияСвязьСоциологияСпортСтандартизацияСтроительствоТехнологииТорговляТуризмФизикаФизиологияФилософияФинансыХимияХозяйствоЦеннообразованиеЧерчениеЭкологияЭконометрикаЭкономикаЭлектроникаЮриспунденкция |
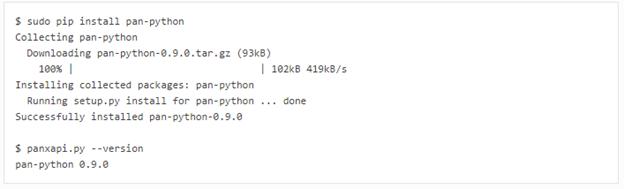
Example: Install pan-python Using pip
Note By default pipinstalls the latest version of the package and the version will be different than shown above. INDEPENDENT WORK 1. Install pan-python using pip and display its version. 2. Run panxapi.pywith –helpto display command line options. 3. View panxapi.py documentation on GitHub.
The panxapi.py –koption performs the type=keygen API request to generate the API key for an administrator account. The –hand –l(ell) options specify the hostname or IP address of the firewall and username and password arguments for the API request. Example: Generate API Key
Note For brevity, the labs use the superuser administrator account admin; creating API administrator accounts using a custom admin role with the least privilege set of XML API types required for your usage, is recommended.
A .panrc file contains hostname and API key variables optionally referenced by a tagname using the panxapi.py –t option. -t combined with -h, -l and -k panxapi.py writes .panrc format lines to stdout. Example: Generate .panrc Format
Shell output redirection can be used to create your .panrc file. Example: Create .panrc File Using Shell Output Redirection
Note The password was not specified on the command line and the user is prompted for it. The .panrc file contains authentication material; it should have strict file permissions (read/write for the owner, and not accessible by group or other). The .panrc file entries with your tagname are verified by performing an operational command API request with -o cmd.
Example: Verify .panrc File
Note -X converts a CLI command to XML which is required for the API request: show clock is converted to <show><clock></clock></show>. -x prints the XML response to stdout.
INDEPENDENT WORK 1. Create a .panrc file in your account's $HOMEdirectory containing tagname tagged entries for your lab firewall api_keyand hostname. Hint Use the shell redirection method shown above. 2. Perform an operational command API request to verify your .panrc file api_keyand hostnameentries.
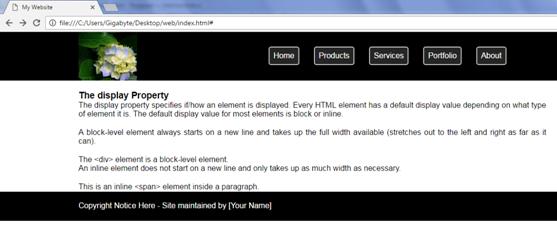
Laboratory work № 9 Security instructions for working with computers: Before turning on of the computer, you must examine the personal computer on integrity of the computer case, that wires don't disturb work and movement; Optimum distance of eyes up to the monitor during working time (60-70 cm.); It is strictly forbidden: To touch to wires, forks, sockets, move of the equipment during working time; To work at the computer wet hands or in wet clothes; To put any subjects or to spill liquids on the computer or the keyboard; At detection of defects in operation of the computer, a smell of burning, you have to stop work, switch off the computer and tell to the teacher.  LEARN“Data acquisition from the server. Design of the graphic interface Web applications. Creation of styles” THE PURPOSE OF LABORATORY WORK –getting by students of skills of styles creation LEARNING MATERIALSyou can see in “ICT_lab9” folder - “Theoretical_material.doc”. LABORATORY TASKS 1. Open the Notepad++ and type following code to create web page: <html> <head> <title> My Website </title> </head> <body> <div class="header"> /block of site header/ <div class="container"> / block for placing links / <div class="logoArea"></div> /block of image/ <div class="navArea"> /block of links/ <ul class="nav"> /list of links/ <a href="#"><li>Home</li></a> <a href="#"><li>Products</li></a> <a href="#"><li>Services</li></a> <a href="#"><li>Portfolio</li></a> <a href="#"><li>About</li></a> </ul> </div> </div> </div> </body> </html> 2. Save the document in new folder as “Index.html”. In your folder appears web document “Index”, which contains the list. Open new page in the Notepad++ and type code of style for <body> tag and save it as “style.css” in your folder: * {margin:0; padding:0} body { font-family:arial;}
3. In “Index.html” file between opening and closing <head> tags type following code:<link href="style.css" type="text/css" rel="stylesheet">for linking web document with page of style, save document. Renew web page in browser (F5 button) and look at result. 4. Type in “style.css” file following code and explain it: .header { background-color:black; height:100px; width:100%; } .container { width:960px; height: auto; margin:0 auto; }
.logoArea { width:120px; height:100px; background-image:url(Hydrangeas.jpg)*; float:left; }
.navArea { width:600px; height:100px; float:right; } .nav { list-style:none; margin-top:30px; }
a { color: white; text-decoration:none; } li { float:left; margin-left:30px; background-color:#252525; padding:8px; border:2px solid silver; border-radius:5px; } li:hover { background-color:gray; }
*Hydrangeas.jpg - any picture for header of your site.
5. Type in “index.html” file following blocks: <div class="mainArea"> /main block of site/ <div class="container page"> /block for text/ Type here information about you and decorate it using html-tags. </div> </div> <div class="footer">/footer block of site/ <div class="container"> Copyright Notice Here - Site maintained by [Your Name]</div> /block for text of footer block/ </div> 6. Add in “style.css” file following code for adding blocks and explain it:
.page { background-color:white; padding:20px; padding-bottom:1px; }
.footer { background-color:black; height:40px; width:100%; color:white; padding-top:20px; } 7. Save files, renew browser and look at result. 8.
INDIVIDUAL TASKS 2. Decorate paragraph using inline styling and internal styling. 3. Divide to frames the page. Add new pages and create links for relevant pages 4. Develop own website structure and create site for following subjects:
QUESTIONS 6. What do we use <div> tag for? 7. CSS syntax 8. Inline Styling 9. Internal Styling 10. External Styling REFERENCES 11. Матросов А., Сергеев А., Чаунин М. HTML 4.0- Санкт-Петербург, из. BHV (в подлиннике) 12. В.Холмогоров. Основы Веб-мастерства. – Питер, 2010. 13. http://www.w3schools.com/html/default.asp 14. http://www.w3schools.com/css/default.asp 15. www.youtube.com
Laboratory research 10 Security instructions for working with computers: Before turning on of the computer, you must examine the personal computer on integrity of the computer case, that wires don't disturb work and movement; Optimum distance of eyes up to the monitor during working time (60-70 cm.); It is strictly forbidden: To touch to wires, forks, sockets, move of the equipment during working time; To work at the computer wet hands or in wet clothes; To put any subjects or to spill liquids on the computer or the keyboard; At detection of defects in operation of the computer, a smell of burning, you have to stop work, switch off the computer and tell to the teacher. |
||||||||||||||||||||||||||||||||||||||||||||||
|
|
Последнее изменение этой страницы: 2018-04-12; просмотров: 1206. stydopedya.ru не претендует на авторское право материалов, которые вылажены, но предоставляет бесплатный доступ к ним. В случае нарушения авторского права или персональных данных напишите сюда... |