|
Студопедия КАТЕГОРИИ: АвтоАвтоматизацияАрхитектураАстрономияАудитБиологияБухгалтерияВоенное делоГенетикаГеографияГеологияГосударствоДомЖурналистика и СМИИзобретательствоИностранные языкиИнформатикаИскусствоИсторияКомпьютерыКулинарияКультураЛексикологияЛитератураЛогикаМаркетингМатематикаМашиностроениеМедицинаМенеджментМеталлы и СваркаМеханикаМузыкаНаселениеОбразованиеОхрана безопасности жизниОхрана ТрудаПедагогикаПолитикаПравоПриборостроениеПрограммированиеПроизводствоПромышленностьПсихологияРадиоРегилияСвязьСоциологияСпортСтандартизацияСтроительствоТехнологииТорговляТуризмФизикаФизиологияФилософияФинансыХимияХозяйствоЦеннообразованиеЧерчениеЭкологияЭконометрикаЭкономикаЭлектроникаЮриспунденкция |
Laboratory work № 11- PART 2Objectives: Ø Adding text (Titles, Credits, content) Ø Text Animations and Effects Ø Timelines and Overlays Ø Exporting to wp4 format
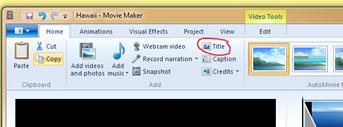
a. Click on the first image (the blue water and blue sky) on top ribbon tab area and then click on the Home tab. b. Click on the Title button:
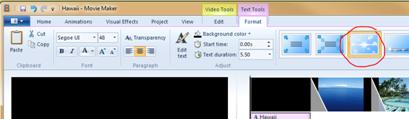
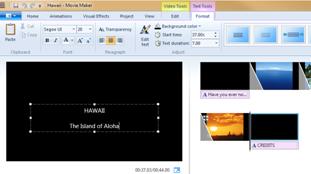
c. The word Hawaii will be the title right now, as it is the name of your file. Replace the text Hawaii with: Mother Nature makes such a perfect playmate? d. Change the font size to 36 e. You will now be on the Format Tab. Notice to the right the Effects (Blue squares with lines in the middle), click on the “Cinematic - burst 1” effect (circled below, you might have to scroll down to see it):
HAWAII
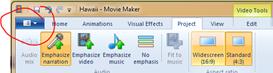
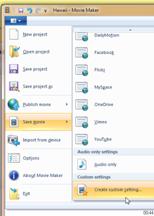
a. Firstly, let’s make the movie so that it is a 4:3 ratio (Standard size) rather than 16:9 ratio (Widescreen, more of a High Definition Screen Size). Click on the tab called Project along the top ribbon bar and then click on the Standard (4:3) button. b. Click on the dropdown arrow in the top left corner:
to get the File menu to appear and then select the Save Movie option.
c. Click on the small arrow at the bottom of theSave Movie options to see the very last option, it will be called: Create custom setting…
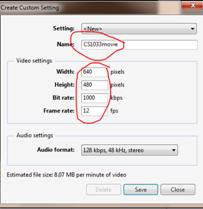
d. Give your new setting the following values: I. Name: CS1033movie II. Width: 640 pixels III. Height: 480 pixels IV. Bit Rate: 1000 kps V. Frame Rate: 12 fps It should look like this, then hit the Save button twice and then the Close button.
e. Click on the Save movieoption again (from the top left Dropdown arrow to get the File menu) and now one of the options should be the one you just created called CS1033movie, select that option.  NOTE: the nice thing about creating this setting is that it will stop the movie file to be too large as we have reduced the size in pixels and the reduced the frame rate and reduced the bitrate. When creating your final movie for your major assignment, it is a good idea to use the settings above so that your file isn’t too large. f. Save the file as Hawaii_Final.mp4 in your lab11 folder. mp4 is now the standard preferred format for movie files on any operating system (Windows or Mac). Click on the Open folder button, make sure the new movie is in your lab11 folder and double click on the Hawaii_Final.mp4 file to play it and make sure it works. g. Now, just as an experiment, select File>Save movie> Recommended for this project and this time, use the file name Hawaii_TEST.mp4. Then open the folder and compare the 2 files: Hawaii_Final.mp4 to Hawaii_TEST.mp4. Notice the difference in the file sizes. Double click on the Hawaii_TEST.mp4 to play that file and notice it is bigger when it plays.
a. A file with the extension .wlmp is your native file. This is where you do your editing. REMEMBER: IF you move the images, audio and/or video (original source files) used to build the .wlmp file to different folders AFTER you built the .wlmp file, then your .wlmp file will get confused and no longer work. b. The file with the extension .mp4 is your final movie file, the one that you will insert into your webpage. .mp4 is a more “universal” file type and can be opened by a number of programs (QuickTime, Windows Media Player, etc). After you have created your .mp4, you can move any images/sound/videos that were used to create it without ruining your .mp4 file, it will be intact.
|
||
|
|
Последнее изменение этой страницы: 2018-04-12; просмотров: 883. stydopedya.ru не претендует на авторское право материалов, которые вылажены, но предоставляет бесплатный доступ к ним. В случае нарушения авторского права или персональных данных напишите сюда... |