Студопедия

КАТЕГОРИИ:

АвтоАвтоматизацияАрхитектураАстрономияАудитБиологияБухгалтерияВоенное делоГенетикаГеографияГеологияГосударствоДомЖурналистика и СМИИзобретательствоИностранные языкиИнформатикаИскусствоИсторияКомпьютерыКулинарияКультураЛексикологияЛитератураЛогикаМаркетингМатематикаМашиностроениеМедицинаМенеджментМеталлы и СваркаМеханикаМузыкаНаселениеОбразованиеОхрана безопасности жизниОхрана ТрудаПедагогикаПолитикаПравоПриборостроениеПрограммированиеПроизводствоПромышленностьПсихологияРадиоРегилияСвязьСоциологияСпортСтандартизацияСтроительствоТехнологииТорговляТуризмФизикаФизиологияФилософияФинансыХимияХозяйствоЦеннообразованиеЧерчениеЭкологияЭконометрикаЭкономикаЭлектроникаЮриспунденкция

Laboratory work № 11 - PART 1


Security instructions for working with computers:

Before turning on of the computer, you must examine the personal computer on integrity of the computer case, that wires don't disturb work and movement;

Optimum distance of eyes up to the monitor during working time (60-70 cm.);

It is strictly forbidden:

To touch to wires, forks, sockets, move of the equipment during working time;

To work at the computer wet hands or in wet clothes;

To put any subjects or to spill liquids on the computer or the keyboard;

At detection of defects in operation of the computer, a smell of burning, you have to stop work, switch off the computer and tell to the teacher.

Objectives:

Ø Creating a Movie Maker project

Ø Creating a Collection - Images

Ø Using a Storyboard to create a Slideshow

Ø Video Transitions and Video Effects

For this tutorial we will be creating a promotional slideshow movie for Hawaii using images and text.


  1. Start Movie Maker 2012. It can be found by going to: Start>All Programs> Movie Maker 
  2. Create a new Project from the top ribbon menu (in the top left corner), click on the small dropdown triangle: and then select:  New Project.

  1. Save the Project as Hawaii.wlmp in your lab folder.
  2. To import contents into your empty Project:
    1. In Movie Maker, make sure the Home tab is selected in the top ribbon/tab area.
    2. Then select the button “Add videos and photos”.
    3. Select the folder in your lab11 folder called images.
    4. Then select ALL the images (click on the first image, hold down the shift key and select the last image, this should select all the images)
    5.  Click on the “Open” button.
    6. Your project should now look like this:

  1. Preview our slideshow so far:
    1. Underneath the first image of the water (the large image on the left) you will see a play button that will play the movie and move the play head bar, press that button to watch your slideshow so far.
    2. Notice that each image stays on the screen for 7 seconds, this is the default setting. Note the entire length of the movie is 42 seconds. We will change that for one of the images. Click on the picture of the red and white and blue parachute and then click on “Edit” tab from the top ribbon menu. Change the “Duration” from 7.00 to 3.00 for this image only. Watch the movie again and make sure the parachute only displays for 3 seconds.
    3. Move the play head back to the beginning of the movie.

  2. Adding some transitions:

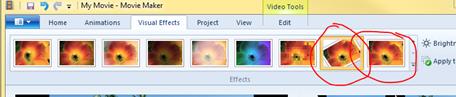
On the top Tab Ribbon click on the Animations tab. There, on the left side, right under the tabs, you will see a listing of all the video transitions we can use for our movie. Video Transitions are “transition effects” that will occur when Movie Maker goes from one slide (or clip) to the next.

    1. Browse through the Video Transitions and click BETWEEN the images and then click on the transition you want to add, add the following 5 transitions (circled below) to in between the 6 images:

I. Image 1 to Image 2: Filled V, Down

II. Image 2 to Image 3: Filled V, Up

III. Image 3 to Image 4: Filled V, Left

IV. Image 4 to Image 5: Filled V, Right

V. Image 5 to Image 6: Bars, Horizontal


NOTE: if you make a mistake and click on the wrong transition and want to remove it, then move your mouse to location where you want to remove a transition and click on the very first BLANK transition and that will remove the existing transition.


  1. Click on the first image (the blue water and sky) and then you will see other transitions that can be used to fade in. Click on the pixelate fade in transition (circled below).


  1. Preview your movie by clicking the first slide (to rewind to the start), then press the Play button. Note the movie length is 31.5 seconds.


  1. Adding Video Effects:
    1. On the top Tab Ribbon click on the Visual Effects tab. While video transitions controlled the transition between two slides or clips, Video Effects give a special effect on a single slide. Use the following figure to help you figure out which effects to apply:

    1. Click on the image of the red, white and blue parachute and click on the Spin 360 effect.
    2. Click on the last image (the sunset) and click on the Warp effect.


  1. Preview your movie again.


Последнее изменение этой страницы: 2018-04-12; просмотров: 944.

stydopedya.ru не претендует на авторское право материалов, которые вылажены, но предоставляет бесплатный доступ к ним. В случае нарушения авторского права или персональных данных напишите сюда...