|
Студопедия КАТЕГОРИИ: АвтоАвтоматизацияАрхитектураАстрономияАудитБиологияБухгалтерияВоенное делоГенетикаГеографияГеологияГосударствоДомЖурналистика и СМИИзобретательствоИностранные языкиИнформатикаИскусствоИсторияКомпьютерыКулинарияКультураЛексикологияЛитератураЛогикаМаркетингМатематикаМашиностроениеМедицинаМенеджментМеталлы и СваркаМеханикаМузыкаНаселениеОбразованиеОхрана безопасности жизниОхрана ТрудаПедагогикаПолитикаПравоПриборостроениеПрограммированиеПроизводствоПромышленностьПсихологияРадиоРегилияСвязьСоциологияСпортСтандартизацияСтроительствоТехнологииТорговляТуризмФизикаФизиологияФилософияФинансыХимияХозяйствоЦеннообразованиеЧерчениеЭкологияЭконометрикаЭкономикаЭлектроникаЮриспунденкция |
Determination of properties of an operating system. Operation with files and directoriesThe aim of a laboratory workis to learn the general properties of operating systems, the main operations with Windows file system. The objectives: - learn the properties of an operation system; - open and navigate Windows Explorer; - interpret the symbols and structures used in Windows Explorer; - display hidden and system files in Windows Explorer; - reconfigure the details view of files and directories to reveal enhanced properties; - sort files by characteristics, such as date created, size, and alphabetical order; - modify Windows Explorer to view additional file details; - compare and contrast Windows operating system file structures. Equipment:computer with Windows OS
batch processing, multitasking, multiprogramming, interactivity, real time system, distributed environment, spool, file structure, pane, desktop, downloads, public, documents, network, directory tree, double-click, expanded
An Operating System (OS) is an interface between computer user and computer hardware. An operating system is software, which performs all the basic tasks like file management, memory management, process management, handling input and output, and controlling peripheral devices such as disk drives and printers. Some popular Operating Systems include Linux, Windows, OS X, VMS, OS/400, AIX, z/OS, etc. Operating System - Properties Batch processing - Batch processing is a technique in which an Operating System collects the programs and data together in a batch before processing starts. Multitasking - Multitasking is when multiple jobs are executed by the CPU simultaneously by switching between them. Switches occur so frequently that the users may interact with each program while it is running. Multiprogramming - Sharing the processor, when two or more programs reside in memory at the same time, is referred as multiprogramming. Multiprogramming assumes a single shared processor. Multiprogramming increases CPU utilization by organizing jobs so that the CPU always has one to execute. Interactivity - Interactivity refers to the ability of users to interact with a computer system. An Operating system provides the user an interface to interact with the system, manages input devices to take inputs from the user (for example, keyboard), manages output devices to show outputs to the user (for example, Monitor). Real Time System - Real-time systems are usually dedicated, embedded systems. In such systems, Operating Systems typically read from and react to sensor data. The Operating system must guarantee response to events within fixed periods of time to ensure correct performance. Distributed Environment - A distributed environment refers to multiple independent CPUs or processors in a computer system. The OS distributes computation logics among several physical processors. Each processor has its own local memory. The OS manages the communications between the processors. They communicate with each other through various communication lines.  Spooling - Spooling is an acronym for simultaneous peripheral operations on line. Spooling refers to putting data of various I/O jobs in a buffer. This buffer is a special area in memory or hard disk which is accessible to I/O devices.
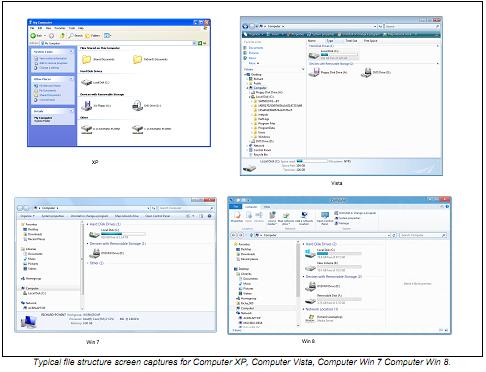
Windows OS file structure The Windows file structure is revealed in different ways depending on which operating system you are using. · Windows XP – Right-click My Computer | Explore or Open · Windows Vista – Right-click Computer | Explore or Open · Windows 7 – Right-click Computer Open · Windows 8 – Select Computer App The display should be similar to that shown in the following screen capture.
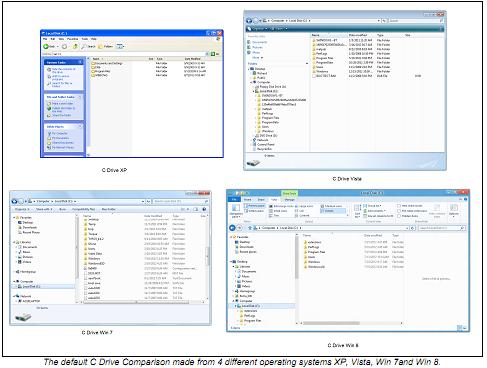
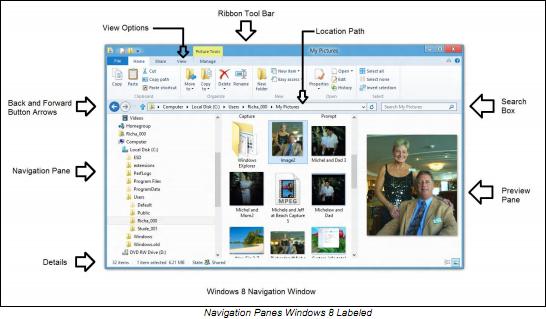
Notice that system tasks are listed in the left pane of Windows XP Explorer. In the next versions of the operating system starting with Vista, task options in the left pane of Windows XP was redesigned to display the system navigation with locations in the directory structure such as desktop, downloads, public, documents, network, and more. Tasks were moved to the tool bar area above the viewing panels in Windows Vista and Windows 7 as well. Windows 8 then, introduced the term “Ribbon” for the area above the viewing pane that serves the same purpose as the previous tool bar. The tasks are directly related to the item selected in the navigation pane. For example, when the Documents folder is select, tasks are displayed relating directly to the Documents folder such as “New Folder” or “Delete”. In the first or top level of the directory structure, you can see icons for all available storage devices, including the floppy drives, hard drives if present, and optical disc drives. Double-clicking a drive or directory icon reveals the next level of folders and files for that drive or directory. For example, double-clicking a drive icon reveals a detailed view of the directory structure of the drive. In the following screen capture, you can see a typical directory structure of a C drive for a Windows XP computer. This view was created by double-clicking the Local Disk (C:) icon. The second common method for revealing the directory structure in Windows XP, and Vista Not (Windows 7) is to open the Start menu, right-click My Computer for Windows XP, Start menu, right- click Computer for Windows Vista, and then select Explore from the shortcut menu. There is no explorer option in Windows 7 after right-clicking the Start menu Computer. There is no Start menu option in Windows 8. When this method is used, the left pane will display the directory structure by default rather than the common tasks view. Look at the following screen capture to see what a typical directory tree view using the right-click method would reveal. Windows 7 and Windows 8 reveal similar directory structure by double-clicking on the C: drive.
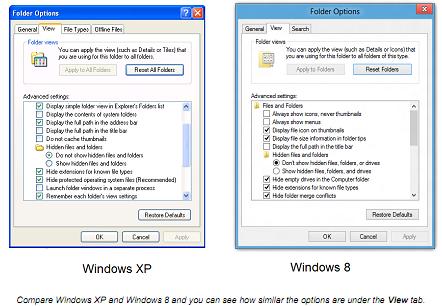
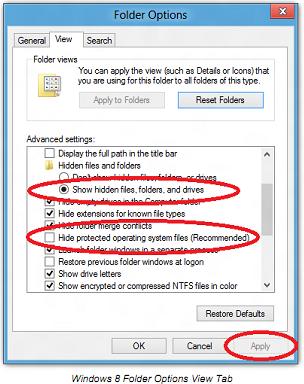
In the screen capture, you can see the files and folders found under drive “C:” for Windows operating systems. (These are typical drive C directory structures; however, it may not necessarily match the one on the computer you are using.) This is the preferred view of the directory structure for technicians because it displays the hierarchy of the file system structure. This means that the Explorer window allows you to see a detailed display of files, directories (folders), and paths all at one time. You can change back and forth by clicking the Folders button located in the toolbar. Note that Windows Explorer displays information about the files and their structure by default in two panes. The pane on the left displays the path structure (the available drives, directories, and subdirectories) as an expandable and a collapsible tree. The pane on the right displays the contents of the directory or subdirectory selected on the left . At times Windows Vista, Windows 7 and Windows 8 will have three panes displayed. The pane on the right is the preview pane that displays the contents of a file selected in the center pane. The three-pane display is not always enabled by default. There will be more about the three pane display in the individual lab activities. To select a new directory, click the directory’s icon. To expand or collapse a branch in the directory tree, double-click the directory’s icon or click the box to the left of the folder icon. In the previous screen capture, drive C is highlighted on the left. The files and directories contained in the drive’s root directory are displayed on the right. The latest Windows Explorer systems are similar in many ways to that of Windows XP, but there are also many differences. For example, the commonly accessed tasks are not displayed in the left pane the way they are in Windows XP. Windows XP Explorer and later systems use drive C as the default directory or root directory. The term root directory refers to the first directory created on a drive when the operating system is first installed and where the files required to boot the computer operating system are installed. Take special notice of the plus (+) and minus (–) signs in the small boxes to the left of the directory structure in Windows XP. A directory that contains unexpanded subdirectories is indicated by a plus sign (+) in front of the directory name. Clicking the box expands, or reveals, the subdirectories in the directory tree. When the subdirectories are expanded, a minus sign replaces the plus sign in the box. Directories that contain no subdirectories have no box to the left of their folder icon. Windows Vista and later dropped the use of the plus and minus sign in a box, and simply uses a folder to indicate a directory. Certain files and folders (directories) are hidden by default. For example, the files required to boot the computer system are hidden to prevent accidentally moving or deleting the files. Hidden files and folders can be revealed by the system administrator or a user with security equal to the system administrator. To display hidden and system files in Windows XP Explorer, select Tools from the menu and then select Folder Options as indicated in the following screen capture. A Folder Options dialog box similar to the following will be revealed. Select the View tab to reveal a list of viewing options that can be selected using a simple mouse click. Look at a partial list of options below. A dialog box very similar to the Windows XP Folders Option dialog box will appear. Look at the following screen capture of the Folder Options dialog box in Windows 8, and compare it to the Windows XP version shown earlier.
Pay particular attention to the three options: Do not show hidden files and folders, Show hidden files and folders, and Hide protected operating system files (Recommended). By default, the Do not show hidden files and folders, and Hide protected operating system files (Recommended) is selected. You select the appropriate option to view hidden and system files in Windows Explorer. Also, note that there is a button in the lower-right corner labeled Restore Defaults, which is used to return the settings to their original condition. Compare the following screen captures to see what happens when the hidden and system files are revealed in the directory structure. The hidden and system files are displayed lightly rather than sharp and crisp. This is so they can be easily distinguished from regular files. The appearance is very similar in all versions of Windows operating system.
The details view of files and folders in all Windows Operating systems is the preferred method of technicians to view the directory structure. In addition to the default details view, you can modify the view to include many different file options. For example, you can include much more file information in the Windows Explorer detail view. You can add additional information columns for such things as file extensions, author, URL, product version and much more.
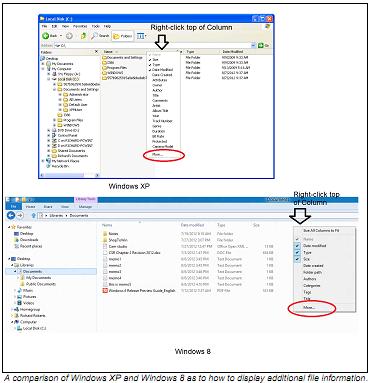
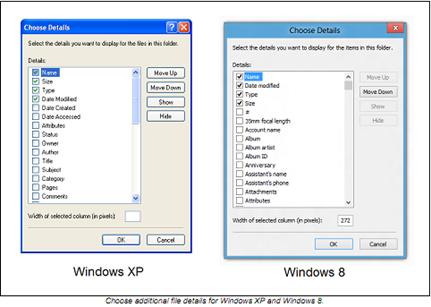
The number of details about files has been greatly increased in Windows Vista and later systems. Many of the details include Web page information and information that is typically stored in Microsoft Office application documents. You access the Choose Details dialog box in the same way for all versions of Windows. Simply right-click the top row of any column in the detail view of Windows Explorer to reveal the “More” option. Clicking the More option reveals a complete list of available details as shown in the following screen capture. Below you can see the results from right-click at the top of the column. A list of details is revealed.
To generate a list of more file detail options simply select the “More…” option and a much longer list of file details can be chosen from. Below is a screen capture comparison of Windows XP and Windows 8 choose file details options.
After the detail is selected, a new column is automatically generated to the right side of the existing columns. If the column is empty, it means that there are no such file details available for the file. Since many of the file details depend on the proper configuration of application software, the details selected may not appear in the column. For example, if you do not enter information into the Author textbox in a Properties dialog box for a Microsoft Office document, then the Author column detail will be blank. You can sort the files by double-clicking the top of anyone of the detail view column headings. For example, double-clicking the file name rearranges the file name list in alphabetical order; double-clicking the size of the file automatically rearranges the column list by file size; double-clicking the file type reorganizes the files by file types, such as documents, or images.
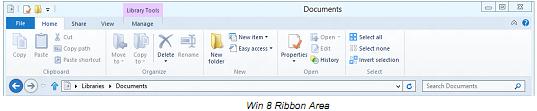
Tasks Windows 8 The biggest change in the Windows 8 navigation window is the new design of the toolbar which is now called the Ribbon or Ribbon tool bar.
1. Boot the computer and verify it is in working order. 2. Select the Search charm to reveal the system Apps. 3. Select Windows Explorer. 4. Look at the left pane and study the navigation structure. You should see folders identified as Desktop, Downloads, Libraries, Documents HomeGroup and your current User Account name. If not, call your instructor for assistance. 5. Select the Documents folder in the left pane under Libraries. 6. At the top of the Windows Explorer Ribbon, select the Home tab and review the menu options.
7. Take a moment and select each of the tabs at the top of Windows Explorer, File, 8. Home, Share, View, and Manage to see how the content of the menu options change for each tab. 9. Close all Windows and then open Control Panel from the Apps window. 10. From the Control Panel select Appearance and Personalize and then Folder Options and then Show Hidden File and Folders. 11. In Folder Options select the View tab and then select “Show hidden files, folders, or drives” and also remove the check from the box in front of “Hide protected operating system files”. You must select the Apply button for the new options to take effect.
12. Close the Folder Options windows and open the Windows Explorer once more. Look at the C: directory contents to see if there is any hidden content reveal. Hidden folders will appear as a lighter in color folder. You may see hidden folders with names such as ESD, Recovery, Program Files, and System Volume Information. 13. Close Windows Explorer and open the Folder Options windows once more. Select the 14. Restore Defaults option button to restore the system to its default condition of do not show “hidden files and folders” and “hide protected operating system files (Recommended)”. Then close the Folder Options window. 15. Open Windows Explorer once more and look at the folders under the C: partition. The hidden folders should not appear this time. 16. Select the Pictures folder under Libraries and view the contents of the folder. 17. Select the View tab at the top of the Ribbon area and then select the Details option. 18. You will see all folders and or files listed with default details such as Name, Date, and Size. 19. Right-click at the top of the Name column and then select the more option from the drop down menu list. 20. Select the following details, Attributes, Authors, Date last saved, and File Extension. 21. See how the new details have been added to the Windows Explorer detail view. You should see columns added for the selected details. If not, call your instructor for assistance. 22. Right-click the top of the column once more but this time you should see the newly added details in the drop down menu list near the top of the list. Remove the recently added details, Attributes, Authors, Date last saved, and File Extension. 23. Take a moment to study the structure of the left navigation panel. Compare the Windows 8 to the Windows 7 navigation pane contents. Look for the following folders, Desktop, Downloads, Libraries, Documents, Homegroup, Computer, USERS and the User Account you are currently using. 24. Take a few minutes to review the laboratory activity. Practice accessing the Folder Options dialog box without the aid of your lab manual. 25. Complete the review questions. When you are finished answering the review question, return the computer to its original configuration and shut down the computer.
Questions 1. Which Windows Explorer view allows you to sort files by type? 2. Why are system files hidden by default? 3. What does a plus sign in front of a folder in Windows XP directory tree mean? 4. What is the path in Windows XP to the Folder Options dialog box starting from the Start menu? 5. What is the path in Windows Vista, Windows 7 and Windows 8 to the Folder Options dialog box starting from the Start menu? 6. How can you rearrange the detailed list of files in descending order by file size when viewed in Windows Explorer? 7. Which operating system first introduced the Library feature? 8. Which operating system first introduced the Public folder feature? 9. Which operating system expanded the Public Folders feature to include multiple Public Folders? 10. Which operating system first introduced Homegroup feature? 11. Which two categories of folders or files are not displayed in Windows Explorer by default? 12. What is the complete path to Folder Options in Windows 8? 13. Where is the User Accounts folder located in Windows 7?
Laboratory work № 3 |
||
|
|
Последнее изменение этой страницы: 2018-04-12; просмотров: 5271. stydopedya.ru не претендует на авторское право материалов, которые вылажены, но предоставляет бесплатный доступ к ним. В случае нарушения авторского права или персональных данных напишите сюда... |